Author Archives: Garden and Plate

asparagus

Putting the asparagus beds to bed

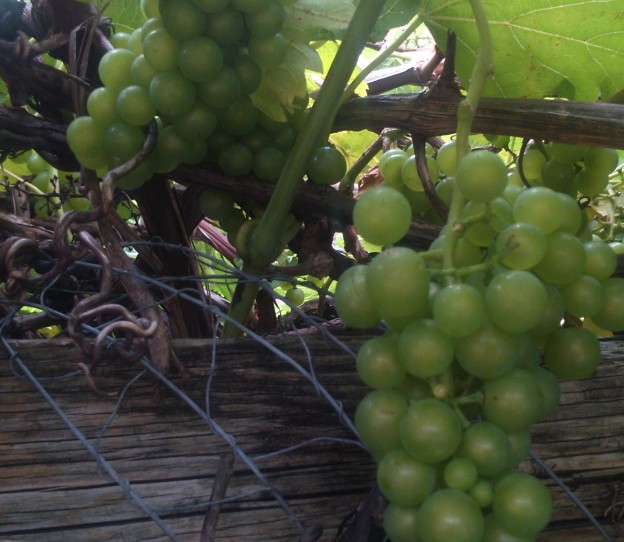
Kilo for kilo Asparagus consistently rates as one of top performers of the farm. When it’s in season it sells out. That is, by definition, product demand. As someone who spent countless hours over the past year, propagating, planting, weeding, hoeing and harvesting it fills me with pride and pleasure when folks are excited by and buying our veg. Feeling this way, is enough motivation for me personally to grow it.

In our modern society where a trip to the supermarket can supply you with nearly anything at anytime of the year, Asparagus being one of the few hold outs makes it special.  In the south of england, Asparagus season falls in between May and June, an incredibly small harvest season by any standard. Add to this that an Asparagus bed takes four years tending before a first cropping can be expected and it isn’t difficult to see why it is likely to stay a seasonal veg.

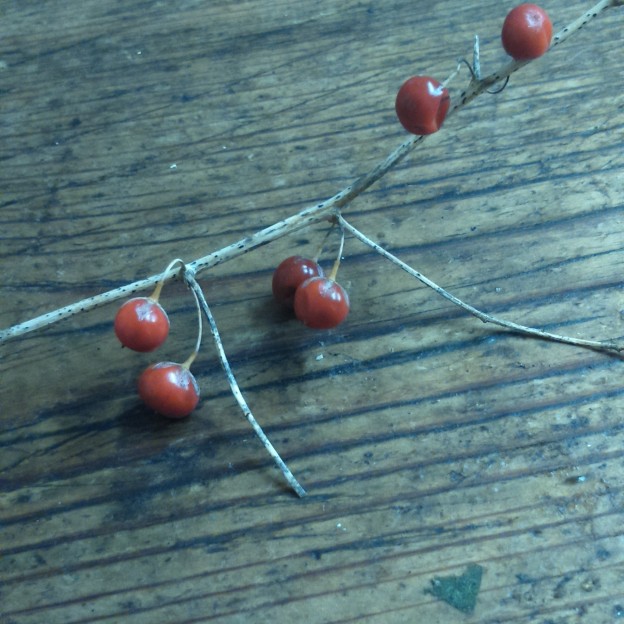
After the last harvest in June the plant is allowed to grow to its full potential, the delicate spears transform into beautiful branches and in the late summer and early fall it’s tiny spherical fruits ripen to a deep shade of garnet as the stocks die back transforming to a brittle stand of golden beige. It’s a this stage in the first weeks of December that we put the Asparagus beds “to bed.”

Before the dry stocks are cut back, we weed the bed a final time. Keeping the dry stocks in situ while doing this allows us to easily estimate where on the bed it is safe to dig. The next years growth of asparagus spears are dependent on their crowns sitting just below the surface of the soil and digging weeds too close to them can inadvertently cause damage.


blue ballet squash seeds

Growing diversity: Spaghetti squash seed saving

You could argue that relative to the return, buying seeds yearly is a small and justifiable expense. Pouring over the seed catalogues can be incredibly exciting with its’ inspiring descriptions and beautiful photography designed to tempt even the most intrepid gardener into trying new or rare cultivars.

Myself, I fall firmly into the category of growers who plan and purchase seed annually. Only a few years ago did i begin saving seed of my own and like many I began with my Tomato seeds. This autumn, with my mind focusing on narrowing the impending “hunger gap” we will undoubtedly face in the colder climes of Norway I’ve been paying close attention to the various cultivars of squash gracing the Market Stall. Hand on heart, I’ve yet to eat a squash I didn’t like.  Some I definitely like better than others and there are many I’ve only recently come across.

I’ve begun saving seeds from the ones that have gotten thumbs up from both of us. I know that this is slightly risky. Unlike saving tomato seeds which self pollinate and can be counted on to reliably reproduce true to type, squash are able to pollinate each other and if grown in close proximity to another type can cross pollinate. The result would still look like the parent however the seed would then not produce true to type the following year.

Professional seed sellers take great precautions to ensure their specimen plants are pollinated only from the correct male flowers often binding a female flower just before it opens opening it to hand pollinate and then rebinding it to ensure the only pollen present is that which they have introduced. It’s not complicated, it’s something I plan to do next season. But in the spirit of adventure, this year I have harvested seeds from those squash I have eaten and enjoyed. There’s a good chance I’ll be able to raise a successful squash crop from them, but no guarantee the vegetables I get will resemble their parents.

I’ve taken a calculated risk. I’ve done this for some specific reasons. Firstly, I would rather begin learning the successful techniques for cleaning and storing seed before i have to do so with the true type seed of the lovely and rare heritage Themla Saunders Sweet Potato squash I’ve purchased for next year. It took me two years to be able to purchase these 7 seeds as they sell out incredibly early, I want to do everything I can to ensure I don’t have to purchase them again!

clean squash seeds

Spaghetti squash seeds. Left is dried 10 days, with membrane still attached, right is with membrane removed and ready for storage and future propagation

Secondly, I happened upon a Spaghetti Squash grown here in the UK. It’s not popular here, but it’s one of my favourites from when I lived in Canada. Delighted and excited to find it, I’ve waxed lyrical and at great lengths to many people and intend to gift seed to everyone I can. As far as I am concerned It took a brave farmer to plan this little known and lovely squash and people need to know about it to develop the market for it. Knowing that allotment people tend to be adventurous and willing to share their bounty, I feel sharing the seeds may help develop a market.

Sharing the seeds out also lets me do some vaguely scientific research. My theory is since none of the people I have allocated seeds to are experienced in growing Spaghetti Squash but each has experience growing successfully in the past hearing of their successes will allow me to gauge if my seed saving techniques are correct. Like I said, “vaguely scientific”!

My method for cleaning seeds came from the packaging of my purchased Thema Saunders. It stated to remove the seeds, clean and allow to dry separated from each other on a flat surface. Further investigation on line suggested to remove the membrane which closely skins the individual seeds. My first attempts to do this was with the newly liberated seeds, it was slippery and difficult. In my second attempt to remove the membrane I waited until ten days of drying. This was also time consuming but much less slippery and therefore, assuming successful propagation will be how i continue to remove the membranes in future.


garlic all year

Garlic all year round

In all my years I have only met one person who did not like garlic, and she would not even let it in her house, most of us use it in at least small quantities in our cooking. I really do believe that every garden, whether its potted, window or a grand allotment should grow at least some of it’s own. Garlic is easy to grow, tastes great and has a multitude of beneficial properties both for us and for our soil.

Modern scientific research has concluded that regular consumption of garlic has a lowering affect on the levels of  LDL cholesterol, lowers blood pressure and even shortens the duration of colds or flu. Many organic farmers believe that adding the dried leaves of harvested garlic back into the compost further extends the antioxidant benefits to the soils. I don’t know that there is any research proving this, but since benefits aren’t exclusive to simply the bulb, it does make sense to me.

This year was my first commercial harvest of garlic. I was lucky enough to be involved in each step, harvest “seed stock” selection, drying, preparation for market sale, grading seed and planting for 2016. Garlic may be one of the easiest in this regard, but I still learned quite a lot.

Organic Lea’s garlic aim is to have a supply year round, which is possible first by grading the seed stock and then though successional plantings. The largest, blemish and disease free bulbs are first chosen at drying. Once they’ve air dried and the papery outers have formed grading begins.

Grading is the process of breaking the bulb into it’s separate cloves and ordering them by size. The biggest outer cloves (bottom of the photo) are planted out in November here, usually around the fifth of November and over winter in the ground.  These will actually begin growing now owing to the moderate climate in the south east of England. These cloves will stay in the field growing the whole next season and be harvested as the dry garlic and seed stock for the following year. By choosing the biggest bulbs for this planting and doing this year on year you are effectively ensuring the best and strongest genes go forward, which over time will increase the overall size of your garlic bulb harvest.

The second category of grading is for the smaller cloves (middle of the photo) these bulbs are planted in spring and will be pulled early for the sale of “wet” garlic in the mid summer months.

Finally the slender inner cloves (top of the photo) are graded. These are sown in December however unlike the smaller bulbs these will be multi-sowen in the field, or under glass meaning each hole will receive more than one clove. We did this the first week of December in the glass house and planted four bulbs per hole. They’re buried at one clove depth. By sewing multiple cloves in this way we are planting to harvest the greens for fresh use as fresh herbs for salad and soups which will be harvested earliest of all, in the early summer.

By using each of the cloves and selecting them for what suits them best the farm (or your garden) can be producing garlic for year round use. Organic lea is lucky enough to have Thermidrome Garlic as it’s seed stock, originally from France it is a variety that does exceptionally well in heavy clay soils.

DSC_0361

Four season farming

Having come from a land of freezing cold, icy and snowy weather I am a late comer to the concept of year round farm production. Here in the milder climate of the South East of England, it is possible with some planning to have fresh produce on the table nearly the entire year long. This concept, and it’s actualization has been one of the biggest areas of learning in my training.

At Organic Lea, the place where I learn my practical farming skills, the more experienced and paid “Growers” who impart their knowledge to us plan and continually experiment with ways to work with nature to achieve year round seasonal fresh produce. Since early September the winter crops have been growing, in October they were hardening off and November, in the short gaps of good weather we began planting in the field. Beans, kales, peas, and garlic are now in the ground to ensure come the first warm days they are set to rocket skyward for early maturation.

Whilst our farm benefits from a massive greenhouse structure, meaning we are still harvesting some of the summers tomato crops, the humble allotment grower can easily mimic more of this than one might first imagine. Cloches, cold frames and even simple fleeces offer enough protection from the mild winters we experience so long as one gets the timing right! In the year two Organic Farming Training course the classes read two very good books that help with their studies, one of which is the masterpiece, Joy Larkcom’s “Grow Your Own Vegetables” a book I would strongly recommend to anyone who is interested in getting the most out of their garden in a sustainable way.


rosehip

Experimental forage: Rosehips

Rosehips are the fruiting body of a rose, all roses have them but because many gardeners “dead head” their ornamental rose bushes to keep them in flower, you may not see many in the urban garden. Britians hedgerows and towpaths are full of them however, and one only need take a short walk in the fall to find these ruby red treasures shining brightly among the barren bushes and rustic backdrop of the autumn colours.

Perhaps more than any other wild flower, the humble rose has played an important part in the history of foraged food in the United Kingdom. During the rationing periods of World War II the British public was widely encouraged to “Dig for Victory” growing foods in their gardens and allotments both for those at home and for the men in the trenches. Along side that encouragement came the public health advisement for mothers to look to the public towpaths and hedgerows for the ever abundant Rosehip and it’s valuable source of vitamin C.

You only need to ask the older generation to hear stories of having been given a daily teaspoon of Rosehip syrup by their mothers. This simple, yet often sickly sweet source of vitamins fell by the wayside after the war when more attractive fruits such as oranges were again available to the public. Passed by often in today’s abundance, the humble and beautiful rosehip remains what it always was, a free and potent contributor to the foragers Lauder.

Whilst the syrup may not be your idea of heaven, and requires some preparations, the rosehip is quite versatile. Rosehip and crabapple jelly is now considered an artisan  treat and even easier Rosehips tea, can quickly be made by topping and tailing the fruits and soaking in hot water. You will want to strain the tea, or anything you make with them however to ensure you aren’t ingesting any of the little hairs that surround it’s seeds. The hairs are the key ingredient to the childhood prank “itching powder” and as such can be rather uncomfortable!


1416657762057

Wild wines and liqueurs

For about four years now, I’ve been an avid amateur wine maker. I like wine and I live largely surrounded by a plethora of wild bramble, unmanaged fruit trees and forgotten hedgerows, it was only a short while before I put to put two and two together and begin to make my own.

Largely, my efforts have been a success owing to Jack Keller’s brilliant website. To date I have made, dandelion, blackberry, plum and sloe wines. I’ve also made some cherry vinegar. It was supposed to be wine, but at least it’s nice to clean with or on salad! Last year I had a bumper production of a whopping 25 bottles. One bottle remains of the sloe which was by far my favorite,  and shall make the trip to Norway.

By now, I should be surrounded by the gentle “ploop, ploop” of secondary fermentation from all of my favorites, but this year I can not partake. It is killing me. Instead, I’m making infusions. I like  them too, don’t get me wrong, but it’s a pale comparison compared to the sense of achievement I get from making wine.

With infusions, you’re virtually guaranteed a good out come. You’re starting with gin or vodka or maybe even brandy, all of these  are from a shop and as such are more or less drinkable. This is not to take away the magic of making a furniture polish grade hard liquor into a sublime and palatable liqueur like the December favorite, Sloe Gin. In fact, I’d encourage anyone who has never made their own liqueur who wants to turn a forage into something amazing to do it. Sloe Gin is simple and very rewarding! If you can’t find Sloes or if you’re not one hundred percent sure what how to identify them, go for another soft fruit. Blackberries are  abundant in most of the United Kingdom and are easily identifiable. I quite like Blackberry vodka.

All you need to make a soft fruit liqueur is the store bought 40% alcohol, a jar, the fruit and some sugar. Exact measurements are not necessary. The more sugar you  use the faster the liqueur will be ready (within reason) and the sweeter it will be. My personal preference is about 25% of the jar to be sugar, 25% fruit and fill to the top with the alcohol. Shake daily until all sugar is dissolved and let the mix mature for one month. Sloe Gin matures very slowly and takes a minimum of three months, but gets infinitely nicer after a year or longer.

Some people remove the fruit after a week, The longer you leave soft fruit, the more it breaks down, so if you want use it I’d do so while after a week when it is still relatively solid.

Personally I prefer gin for sloes,  vodka for cherries, blackberries and plums.  I prefer plum liqueur to plum wine so if I happen to be lucky and get quite a bit, if I get I also do a brandy.

Be forewarned, making your first infusion liqueur is a very likely stepping stone to making wild wine!


IMG_20150917_222742

Experimental forage: Hawthorn tincture

For several years I noticed the bright red berries and distinctive leaves of Hawthorn yet knew nothing about it. It’s not that the information about it is particularly hard to find, I was just busy with the abundance of the already known fruits I’d found growing wild.

Hawthorn’s medicinal use is widely documented in many countries. Indisputably one of natures best medicinal plants for cardiovascular issues. Studies have found it successful in treatments ranging from Congestive Heart Failure to Angina and even removing LDL the “bad cholesterol” from the bloodstream.

My introduction came by way of a Eastern European forager who explained to me in limited English and a lot of gestures, that the berry was for his heart. He went though a lengthy description of drying the berries and then crushing them and then finally using his Bialetti coffee maker to produce a tea which his wife and he drank daily. My second discussion of Hawthorn came from two English lady foragers, who simply said “adding it to brandy or gin made an excellent liqueur” Unfortunately for me, they told me so as they were harvesting the last of the berries in late October time.

IMG_20150918_165038Having high hopes for Hawthorn this year, I made it my business to forage for them early. I’ve made a tincture with 70cl of dry gin, two pints of berries and 6 tablespoons of sugar which will apparently take 12 to 24 months to fully mature. It looks stunning in the jar which is good, because unlike other fruits which only need to be in the alcohol for a week or so, Hawthorn soaks for a month or longer.

In researching I noticed that leaves are also used when making tea so I’ve included a good handful in my experiment.  I didn’t top and tail the berries, so I will have to strain sediment, but I’m ok with that!

Most of the Hawthorn I’ve encountered has been canal side lining the towpaths, but on this particular forage, I found it as the main cultivar of a well trimmed up hedge bordering a public common. It was an exciting discovery. Only this week I had been contemplating what my possible options for windbreak hedges might be for the smallholding. Unlike many other foraged herbs and medicines there seems a nearly universal acceptance  of Hawthorn’s effectiveness. I have to say, I am looking forward to taking this medicine.

IMG_20150912_154226

Experimental forage: Rowan jelly

Experimental foraging isn’t a new thing for me, I was seduced long ago by the tales of my late great Canadian childhood hero, Farley Mowat. Those early days saw me pulling roots to munch from the marshlands and popping windfall nuts casually into my mouth whilst tromping through the woods with my parents. It never occurred to me then that I might just get it wrong. Today, I am a little wiser and a little more cautious but always searching and researching for those wild edibles that make me feel just a little bit more in tune with nature.

Growing up in the northern hemisphere, the Rowan tree, (or Mountain Ash) and I needed no introduction. It was a common yard tree in nearly every neighborhood I’d ever lived in. Finding it in the backstreets of east London’s Bethnal Green, lining the roads in front of council estates was just a reminder that I’d never explored what it’s bright red orange cluster of berries was used for.

It didn’t take long for me to find that this vibrant tree has a long history of uses from jelly and jam to wine. I have a passion for making wine, and this use excited me more than the others. I’ll use the recipe with my regular modifications to exclude any chemicals, but not this year. My impending move and Norway’s insistence on not allowing more that 3 bottles of alcohol in with a person per visit, places this firmly in the “to do” list.

I settled for making syrup or jelly. I am not a big fan of sweet jelly or jam, and as a rule I don’t make things I will not eat, but a savory jelly that apparently is nice with strong cheese or rich roasted lamb? That is something I can certainly try.

My overall quest is to know if Rowan will make a nice wine, but since I may not have three months to ferment, this will have to do. Rowan is often dismissed as poisonous but it has a long history of being used throughout the northern hemisphere the Welsh, English and Norwegian people all knew the secrets of how to use her berries.

It took me two attempts to make something palatable. Rowan is quite astringent and as I was using tiny quantities it was difficult to reliably determine from various recipes what amounts I might like best. Below is what I consider a moderate success, but one with enough promise that I am keen to harvest again next year for wine.

250ml of Savory Rowan Jelly:

2 cups rowan berry
5 heaping tablespoons sugar
3 tablespoons lemon juice  + white rind to help set it
1 inch cinnamon stick
10 peppercorn whole
4 crushed
Cover lemon, cinnamon and rowan with just enough water to cover and  boil for 20 mins
Remove cinnamon and large pieces of white rind
Mash berries and let cool in pan
Strained / hung for 2hrs, over clean pan. Do not squeeze.
Add sugar to the juice and place back pan to boil.  Add crushed peppercorns
Boiled til setting
Jar, cap and let cool.


“The land will provide a rich and diverse range for your plate, if only you know where to look”.  A thought that has stayed with me since childhood and a theory that continues to prove itself the more my knowledge increases.

honey press

Pressing honey

I was very luck last week. I got to take part in the pressing of two boxes of honey from the apiary. Sean Hearn, is the man in charge of all things “bee” at Organic Lea. Through him, I’ve had my first introduction to the style of bee husbandry called “natural bee keeping” which I first wrote about here.

Natural bee keeping is much different than the more commonly practiced or industrial bee keeping, and the more I research different aspects, the more I find myself feeling that the natural method is more to my liking.

Following on from these differences, it should not be a surprise to learn that the process of honey extraction is another area where Sean steers away from the common industrial methods. I remember seeing a program about an off grid couple in the Blueridge mountains in the Appalachian mountain range who had top bar hives. Unfortunately the program was quite light in detail, but the woman did mention “pressing” the comb was the only way they had to release the honey.

I am not a cheap person when it comes to tools, nor am i frivolous. I believe that buying the best tools once is the best investment. When it came to a “honey extractor” I just didn’t like the notion of having a piece of equipment sit around for most of the year because it had only one use. When Sean said I could join the team for pressing, I was very excited but I had no idea how much that afternoon would teach me.

Foremost, wanted to know why Sean felt pressing was a better method than using a centrifuge extractor. I expected it was going to be a similar reason to my own conclusion, that a tool with one use that was used so infrequently wasn’t a good investment but to my surprise this turned out to be quite low on his list.

You see when bees gather nectar, that nectar includes  vitamins and minerals from the plant, the bee process it adding important enzymes and probiotics all in tiny trace amounts. When a bee fills a comb with her honey it is then capped off from the air and it all stays sealed inside.

Harvesting honey requires “uncapping” of the cells. In industrial operations, the uncapped honey gets inserted into a centrifuge which spins with such force air forces the honey out to the sides of the barrel where it drips down into a bucket. The process relies on air. Unfortunately, exposure to air releases some of the enzymes and probiotics. Thus the honey loses a significant amount of it’s original ingredients.

Cold pressing honey relies on pressure to force the honey out of the comb and while it still has contact with some air in the process of reaching the bucket below, this is reduced. Less of those important enzymes and probiotics are lost. Sean, and many other natural bee keepers believe that by retaining as much of these ingredients the honey is closer to it’s natural state and thus nutritionally superior.

I am a honey lover, but that day in the kitchen I tasted something far richer and more complex than even that which I have bought in local markets. It makes me wonder if that might have been the first real honey I have ever tasted?

Perhaps you have heard that honey was at one time considered a healing substance or even a cleanser? I have and I’ve often wondered. It seems logical that honey in it’s purest form was the start of these assertions. Perhaps modern technology, although faster has led us to harvests that may be high in efficiency but falling short on quality.

DSC_0779

Community projects

For the past 9 months I have been a regular volunteer and a trainee at an organic farm in Chingford called Organic Lea. I love them. They offer a space to learn skills and meet people as well as running a box scheme feeds over 300 local families. Over my time with them, one of the things I find most inspiring  is their constant drive to evolve the site.

Since 2001 they’ve had the land and the transformation has been incredible. You can read about this in detail on their website. One of the projects has been a community wine making  and in true community fashion throughout September on Fridays they are accepting grapes from local gardens for processing into wine. For those not interested in wine, the farm also has a community juicing day where people are encouraged to bring their apples and pears along with bottles and help process juices.

How many folks have grape vines or fruit trees even but don’t actually use  the produce? Many. It might be that they inherited a garden or they don’t have the skills to make good wine, aren’t sure about how to use pears or apples or perhaps they don’t have the time. What ever the reason, this project is a complete win:win scenario.