Category Archives: garden

garlic all year

Garlic all year round

In all my years I have only met one person who did not like garlic, and she would not even let it in her house, most of us use it in at least small quantities in our cooking. I really do believe that every garden, whether its potted, window or a grand allotment should grow at least some of it’s own. Garlic is easy to grow, tastes great and has a multitude of beneficial properties both for us and for our soil.

Modern scientific research has concluded that regular consumption of garlic has a lowering affect on the levels of  LDL cholesterol, lowers blood pressure and even shortens the duration of colds or flu. Many organic farmers believe that adding the dried leaves of harvested garlic back into the compost further extends the antioxidant benefits to the soils. I don’t know that there is any research proving this, but since benefits aren’t exclusive to simply the bulb, it does make sense to me.

This year was my first commercial harvest of garlic. I was lucky enough to be involved in each step, harvest “seed stock” selection, drying, preparation for market sale, grading seed and planting for 2016. Garlic may be one of the easiest in this regard, but I still learned quite a lot.

Organic Lea’s garlic aim is to have a supply year round, which is possible first by grading the seed stock and then though successional plantings. The largest, blemish and disease free bulbs are first chosen at drying. Once they’ve air dried and the papery outers have formed grading begins.

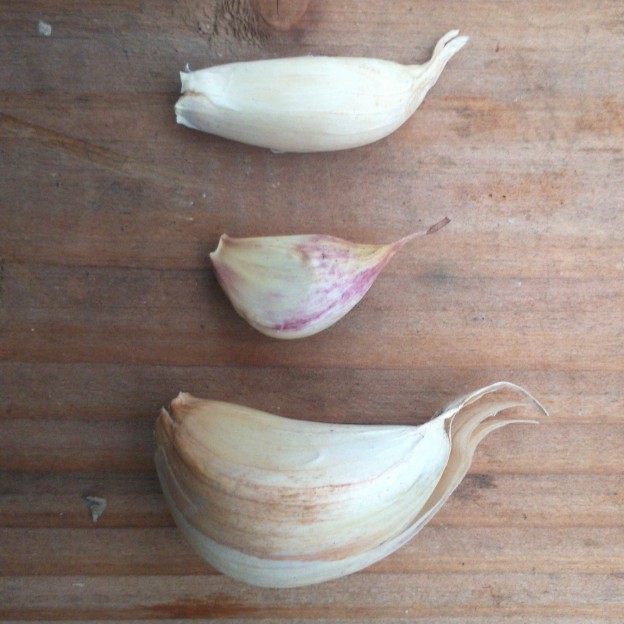
Grading is the process of breaking the bulb into it’s separate cloves and ordering them by size. The biggest outer cloves (bottom of the photo) are planted out in November here, usually around the fifth of November and over winter in the ground.  These will actually begin growing now owing to the moderate climate in the south east of England. These cloves will stay in the field growing the whole next season and be harvested as the dry garlic and seed stock for the following year. By choosing the biggest bulbs for this planting and doing this year on year you are effectively ensuring the best and strongest genes go forward, which over time will increase the overall size of your garlic bulb harvest.

The second category of grading is for the smaller cloves (middle of the photo) these bulbs are planted in spring and will be pulled early for the sale of “wet” garlic in the mid summer months.

Finally the slender inner cloves (top of the photo) are graded. These are sown in December however unlike the smaller bulbs these will be multi-sowen in the field, or under glass meaning each hole will receive more than one clove. We did this the first week of December in the glass house and planted four bulbs per hole. They’re buried at one clove depth. By sewing multiple cloves in this way we are planting to harvest the greens for fresh use as fresh herbs for salad and soups which will be harvested earliest of all, in the early summer.

By using each of the cloves and selecting them for what suits them best the farm (or your garden) can be producing garlic for year round use. Organic lea is lucky enough to have Thermidrome Garlic as it’s seed stock, originally from France it is a variety that does exceptionally well in heavy clay soils.

DSC_0361

Four season farming

Having come from a land of freezing cold, icy and snowy weather I am a late comer to the concept of year round farm production. Here in the milder climate of the South East of England, it is possible with some planning to have fresh produce on the table nearly the entire year long. This concept, and it’s actualization has been one of the biggest areas of learning in my training.

At Organic Lea, the place where I learn my practical farming skills, the more experienced and paid “Growers” who impart their knowledge to us plan and continually experiment with ways to work with nature to achieve year round seasonal fresh produce. Since early September the winter crops have been growing, in October they were hardening off and November, in the short gaps of good weather we began planting in the field. Beans, kales, peas, and garlic are now in the ground to ensure come the first warm days they are set to rocket skyward for early maturation.

Whilst our farm benefits from a massive greenhouse structure, meaning we are still harvesting some of the summers tomato crops, the humble allotment grower can easily mimic more of this than one might first imagine. Cloches, cold frames and even simple fleeces offer enough protection from the mild winters we experience so long as one gets the timing right! In the year two Organic Farming Training course the classes read two very good books that help with their studies, one of which is the masterpiece, Joy Larkcom’s “Grow Your Own Vegetables” a book I would strongly recommend to anyone who is interested in getting the most out of their garden in a sustainable way.


IMG_20150912_154226

Experimental forage: Rowan jelly

Experimental foraging isn’t a new thing for me, I was seduced long ago by the tales of my late great Canadian childhood hero, Farley Mowat. Those early days saw me pulling roots to munch from the marshlands and popping windfall nuts casually into my mouth whilst tromping through the woods with my parents. It never occurred to me then that I might just get it wrong. Today, I am a little wiser and a little more cautious but always searching and researching for those wild edibles that make me feel just a little bit more in tune with nature.

Growing up in the northern hemisphere, the Rowan tree, (or Mountain Ash) and I needed no introduction. It was a common yard tree in nearly every neighborhood I’d ever lived in. Finding it in the backstreets of east London’s Bethnal Green, lining the roads in front of council estates was just a reminder that I’d never explored what it’s bright red orange cluster of berries was used for.

It didn’t take long for me to find that this vibrant tree has a long history of uses from jelly and jam to wine. I have a passion for making wine, and this use excited me more than the others. I’ll use the recipe with my regular modifications to exclude any chemicals, but not this year. My impending move and Norway’s insistence on not allowing more that 3 bottles of alcohol in with a person per visit, places this firmly in the “to do” list.

I settled for making syrup or jelly. I am not a big fan of sweet jelly or jam, and as a rule I don’t make things I will not eat, but a savory jelly that apparently is nice with strong cheese or rich roasted lamb? That is something I can certainly try.

My overall quest is to know if Rowan will make a nice wine, but since I may not have three months to ferment, this will have to do. Rowan is often dismissed as poisonous but it has a long history of being used throughout the northern hemisphere the Welsh, English and Norwegian people all knew the secrets of how to use her berries.

It took me two attempts to make something palatable. Rowan is quite astringent and as I was using tiny quantities it was difficult to reliably determine from various recipes what amounts I might like best. Below is what I consider a moderate success, but one with enough promise that I am keen to harvest again next year for wine.

250ml of Savory Rowan Jelly:

2 cups rowan berry
5 heaping tablespoons sugar
3 tablespoons lemon juice  + white rind to help set it
1 inch cinnamon stick
10 peppercorn whole
4 crushed
Cover lemon, cinnamon and rowan with just enough water to cover and  boil for 20 mins
Remove cinnamon and large pieces of white rind
Mash berries and let cool in pan
Strained / hung for 2hrs, over clean pan. Do not squeeze.
Add sugar to the juice and place back pan to boil.  Add crushed peppercorns
Boiled til setting
Jar, cap and let cool.


“The land will provide a rich and diverse range for your plate, if only you know where to look”.  A thought that has stayed with me since childhood and a theory that continues to prove itself the more my knowledge increases.

DSC_0779

Community projects

For the past 9 months I have been a regular volunteer and a trainee at an organic farm in Chingford called Organic Lea. I love them. They offer a space to learn skills and meet people as well as running a box scheme feeds over 300 local families. Over my time with them, one of the things I find most inspiring  is their constant drive to evolve the site.

Since 2001 they’ve had the land and the transformation has been incredible. You can read about this in detail on their website. One of the projects has been a community wine making  and in true community fashion throughout September on Fridays they are accepting grapes from local gardens for processing into wine. For those not interested in wine, the farm also has a community juicing day where people are encouraged to bring their apples and pears along with bottles and help process juices.

How many folks have grape vines or fruit trees even but don’t actually use  the produce? Many. It might be that they inherited a garden or they don’t have the skills to make good wine, aren’t sure about how to use pears or apples or perhaps they don’t have the time. What ever the reason, this project is a complete win:win scenario.

slug

Three ways to deal with slugs

It’s the time of year when our gardens are starting to really come into their own. Our delicate seedling are full of vigor and the promise of harvest is within sight, we know it and so do the slugs.

Slugs. Grotesque, slimy, and capable of completely devastating your plot. It’s enough to dishearten even the most dedicated and have them reaching for a spray bottle.  There are multiple reasons I won’t use chemicals, but I don’t want to get political.

As an organic gardener, I am always looking for ways to improve my soil. Chemical pesticides and fertilizers may offer a short period gain but ultimately leave our soil poorer.   But how do we “win” against slugs without turning to chemicals?

Pick them off. For those with small plots of vegetables and time, a daily commitment to checking each plant is an ideal solution. Taking time for a daily inspection and removal and disposal will keep slugs in check, but this may not be practical if you’re short of time or if your garden is larger than a few meters.

Mulch. A slug is a delicate creature. It has a soft underbelly and will avoid crossing any mulch that is rough and irritating. I ring of mulch of moderately abrasive material such as diatomaceous earth. I suggest 10 cm wide and at least 1cm thick as an effective barrier, or rough bark mulch. You’ll need to ensure you keep it topped up of course, but weekly inspections should suffice. Mulch should not come in contact with the plant, try to leave a good few centimeters circle empty around each stem. I like this method because along with creating a barrier it also helps keep moisture in the soil.

Provide shelter. Slugs do most of their damage at night. During the day a slug will look for refuge. By placing an piece of untreated board at both ends of your garden row, and one in the middle if the row is long, you’ll encourage the slugs to use this as a daytime refuge. This doesn’t stop them from eating your plants, but it does make collection an  disposal quite easy and quickly puts a dent in the number of slugs feasting on your patch . Simply lift the board each morning and remove the slugs below. A upside down empty grapefruit skin in the same positions also works.

Many a gardener has heard about the effective use of copper in deterring slugs. Every year I hear people talking about copper and pennies. Copper tape, if thick enough may certainly do the trick. My experience is adhering it and ensuring it doesn’t get accidentally covered over by soil, (and thus ineffective), can be laborious, it’s also quite expensive.  Pennies unfortunately, have not contained enough copper to work as cheap substitute for a very long time. My advice is to forget about copper and do two or even all three of the above for success.

Photo from http://www.allaboutslugs.com

This was originally posted on EatinsCanada

DSC_0284

Joys and pitfalls of sunny weather

Sun, rain, wind and even hail have been part of the spring season here in the UK. These last two months have offered challenges and opportunities in equal measure. Every season has the potential to be either a blessing or a ruin to the garden. It’s late May and we have been blessed by an exceptionally nice spring.

It may surprise non gardening people that most traumatic climactic event that happened for my plants this spring was  the week our temperature stayed in the high 20s. While the pasty skinned and sun starved among us reveled, I was vigilant. For myself any other gardeners, above average temperatures for extended periods are a mixed blessing. Young seedlings, if kept moist shoot up and thrive. Other plants take an entirely different route. For me the week began a constant monitoring of pots and plants, watering early and trying to keep balance. By the end of the week however, I had to admit at least partial defeat. Three of of my swiss chard pots, six plants in total, had bolted.

Bolted chard isn’t the end however. The leaves, although less abundant and smaller are still edible. It also gives me a chance to restart a fresh batch from my seedlings. Extending my harvest through a succession of plantings is something I relish. This year with so many bolted plants so early, I’ll be removing them and doing exactly that. One chard will give me more than enough seed however, it’s best to collect future seed from a plant that goes to flower and seed later in the season. To collect from a “easy bolter” would be to carry that undesirable trait on to next year. On a positive note, this gives me the opportunity to replant those pots, it’s only late May so I can expect a late season crop to produce still.

Yes, the gale force winds for three straight days was worrying, but it only meant repositioning my most delicate seedlings under quick made cloches or moving pots to shelter. Torrential rain for another three days gave me time to assess and correct drainage issues. Now, in the first days of summer, most of my garden is looking good and the first setting of fruit is well underway. It was a fantastic and surprising spring.

There is, after all, no such thing as normal weather.

courgette in flower

Grow some of what you eat

Just three weeks ago, my rooftop garden on narrow boat Miracle was starting to look like a winner. The garden I’d planned and planted was just beginning to show its potential and I was pleased.  In a proud moment on that sunny Saturday I snapped a photo and shared it with the world via my Instagram and Twitter accounts. (Garden and Plate now has it’s own Twitter!)

Nearly immediately after sending my “Boast Post” I saw a competition was happening on line by Saltyard Books asking people to post photos of their kitchen garden. The competition was in celebration of a new book by Mark Diacono of Otter Farm, about gardening and getting the most out of your urban kitchen garden.  I’ve never entered any competition before but, it seemed nearly serendipitous, so off went my tweet with their hashtag into the competition.

I’m exceedingly pleased to say, I won the competition and early this week my copy of The New Kitchen Garden arrived. I got to unwrap it just as a very rare UK thunderstorm began.  At just under 400 pages, I can’t pretend that I’ve read it all as yet, but so far, it’s impressive, encouraging and informative. It’s a book that I suspect, I’ll be keeping and referring to quite often. Thank you Mark for writing this!

More about the book here.

*This article was originally published on a fabulous website called EatinsCanada.

1point5sqm

Getting the most out of small spaces

One of my favorite things about gardening is that I can choose what I want to grow each year. I subscribe to the school of thought that  you should plant what you like to eat, however planting the same vegetables every year does get a bit predictable. Experimenting with unusual varieties gives me a kick and expands my knowledge as well as my pallet.

This year, with a view to expand what I can produce in my 1.5m potted roof garden I chose to give planting of “early” and “late” maturing crops a go.  To do this I looked for an early maturing small turnip to pair with my old faithful red onion and some French Marigold. I found a lovely sounding turnip called “Japanese Snowball” which is described as a fast growing, egg shaped globe with a mild sweet juicy flavour. The globes should be harvest size by the end of this month, leaving sufficient space for both the onion and marigold development. I’d never heard of the the Snowball variety before I began looking and was surprised to find it’s been around in western world since at least 1885.

I sewed the seeds as directed both for greens (close) and 2.5cm apart in two rows in mid-late March. I’ve already harvested a crop of young greens from one row and eaten them raw in salad along with some chard,  last week used a few of the larger leaves as a cooked spinach substitute. Obviously, because my rows are small, my harvests are only handfuls however, I can’t believe how quick they are – they’re ready again! The spaced counterparts remain untouched and are sheltering the slower growing marigold beneath their large foliage.

So far I am very pleased with this experiment. I am quite happy with the taste of the greens both raw and cooked and am awaiting the globes with much anticipation. It seems that I’ve doubled the output of my tiny space this year. Looking back, it now seems quite obvious, however I’d not considered this before my work experience on the Organic Lea farm.  I guess it just goes to show what we can learn if we’re open to it.

*This article was originally published on a fabulous website called EatinsCanada.

DSC_0305

Easy DIY organic fertilizer

Here in the United Kingdom, along the rivers and in marsh lands, something nearly magical grows, Symphytum officinale. In may areas it is so prolific there are actual “harvesting days” where the nature reserves encourage gardeners to come and cut what they need.

First introduced to to North America in  1954, you may know it as Quaker’s Comfrey, Knitbone or even as a weed. Regardless of what you call it, it’s indispensable.  Any gardener who wants to fertilize their garden, especially fruiting plants or seeding crops, naturally and healthily should know about and utilize this amazing plant.

It’s a powerful ally of the organic gardener.

What makes this plant exceptional are the levels of nitrogen and potassium it releases upon decomposition.

Comfrey is what you call a “dynamic accumulator.” It has a large turnip shaped tap root that mines up nutrients and minerals from deep within the soil which it brings up into it’s leaves. Because it does this much deeper than most plant roots reach, the surrounding vegetation isn’t compromised and previously unreachable nutrients are made accessible . Harvesting and composting its leaves releases the nitrogen and potassium making them accessible to other plants and the rest of your garden. Quick growing, Comfrey can be harvested boosting the minerals available to your garden organically several times per year eliminating the need to purchase chemical based tomato or plant foods.

Harvesting is easy.  Just before the plant flowers is when you’ll get the most benefit, but around that time is also quite good. Sheer stems about 15cm above ground. Keep the leaves, flowers if you wish and discard the stem. Harvests can occur safely when the plant reaches approximately 60cm,  in spring until early autumn without risk to to the plant. In autumn it’s important to leave pant to grow and rejuvenate it’s stores for overwintering.

Once you have them it’s up to you how you use them. You can choose to make a tea, like the one in our nettle article which takes 4 to 5 weeks,  add them as a two inch mulch around fruiting plants and they will break down naturally or wilt them for two to three days and simply dig it in! Unlike other high nitrogen content sources Comfrey doesn’t rob nitrogen from the soil because it’s C:N ratio is lower than well rotted compost.

If you can’t find wild Comfrey, the cultivated sterile variety Bocking 14 is often available through seed suppliers. If you purchase your own, let it grow one full year before beginning to harvest to allow it a firmly establish. Never dig up and plant a non sterile, wild plant, it will take over your garden quickly. Bocking 14 will grow quite large and is best separated and shared with other gardeners after a few years growth.

This post was originally posted on EatinsCanada

predation

Natural pest management

One of the biggest questions new organic gardeners ask is about pest management.  We all seem to understand the concepts of  open pollination and making fertilizers from plants but when it comes to keeping the pests away, many of us draw a blank. We work so hard to raise our plants that contemplating their decimation is frankly, terrifying. So what can we do?

I am a firm believer that healthy plants and healthy soil do much for our garden when it comes to pests. A strong, healthy plant can tolerate some pests without too much loss. Nonetheless, I also believe in giving the garden a helping hand.  One of the principles I learned at Organic Lea was to try and balance the predator / prey ratio. At first, to me at least, this was a bit of a shock. How many aphids should be in the garden? My natural response was “NONE!” But that, it turns out, is also unnatural.

The beans grown in glasshouse,  were awash with Black Aphid larvae the first week of April. It seemed a dire situation but no one else seemed concerned. When I asked the head gardener about this, he explained that the crop was nearing it’s last winter harvest and was going to be allowed to flower and go to seed. For now we’d simply run our index finger and thumbs up the most infested stocks to squish the aphid larvae, overrun bean tips were to be removed and put into the compost. Although affective for the larvae stage, this is laborious.  Later the same day, our class went out into the nettles to hunt and capture Ladybugs.

Because nettles are one of the first greens of spring, overwintered Ladybugs seek them out as a first source of food. Over two hours we caught twenty. Ladybugs, it turns out are the organic gardeners natural ally against the Aphid. We then released them into the Aphid infested bean plot. Two weeks later, I noticed many tiny cocoons along the wooden skirt boards to the bean plot, Ladybug larvae.

Since an adequate food supply was available in the glasshouse, the Ladybugs stay their whole life cycle. This provides the gardener with a natural defense against Aphid.

Since an adequate food supply was available in the glasshouse, the Ladybugs stay their whole life cycle. This provides the gardener with a natural defense against Aphid.

By introducing the Ladybugs to the Glasshouse, we are able to aid in the balance of predator / prey relationship. If we had killed all of the Aphid larvae the food source for the Ladybug wouldn’t have been available and they would not have stayed. By providing a suitable environment for the Ladybug, including food, suitable pupation and hibernation areas,  she will then in turn and aid us in the long term pest management. There are many such relationships the organic gardener can cultivate with predator insects, all of which will improve your crops survival.

An important part of organic gardening is being able to identify which insects are the “good guys” and which are the ones you want to try and limit. Most children and adults can identify a 7-Spot Ladybug, I find the link below quite useful for identifying the larvae of others.

http://www.ladybird-survey.org/downloads/ladybird_larvae.pdf

*This article was originally published on a fabulous website called EatinsCanada.